How to Make Superior Drummer 3 Sound Human
Nail The Mix Staff
Superior Drummer 3 is an absolute monster of a virtual instrument. But with great power comes great responsibility. The problem isn’t the software, the samples, or the concept of editing; it’s how these tools are used. A real drummer is beautifully imperfect.
They rush, they drag, they hit harder on one stroke than the next, and their stick never lands in the exact same spot twice. Our brains find that variation interesting. When you program a beat that’s too perfect, our brains check out.
If you’re tired of your drum tracks sounding like a robot in a kitchen, you’re in the right place. We’re going to dive deep into Superior Drummer 3 and show you how to leverage its incredible power to create drum performances that feel real, sound huge, and have that all-important human touch.
Superior Drummer 3: The Metal Producer’s Powerhouse
Before we get into fixing the “fake” sound, let’s acknowledge why SD3 is the go-to for so many metal producers. It’s not just a collection of samples; it’s a comprehensive drum production studio inside your DAW.
The core library alone is over 230 GB, recorded by the legendary engineer George Massenburg. That means you’re starting with pristine, world-class recordings. But for metal, its true strength lies in its insane level of detail and control.

Pros for Metal Producers:
- Unmatched Detail: SD3 doesn’t just give you a “kick” and “snare” sample. It gives you multiple microphone positions for every single kit piece—direct mics, overheads, multiple room mic pairs, and more. This lets you shape your drum tone with the same precision you would in a high-end studio.
- Powerful Internal Mixer: The built-in mixer is a full-fledged DAW mixer, complete with top-tier channel strips and effects from FabFilter. You can route, bus, parallel process, and automate everything without ever leaving the plugin.
- Tracker 3 Audio to MIDI: This feature is an absolute game-changer for drum replacement and reinforcement. You can feed it a multi-tracked recording of a real drummer, and it will generate incredibly accurate MIDI that captures the original performance’s timing and velocity nuances.
- The Grid Editor: For programmers, the Grid Editor offers deep control over every MIDI note, allowing for detailed velocity editing, timing adjustments, and articulation changes.
- Expandability: With SDX expansion packs like Area 33 SDX (Fredrik Thordendal and Daniel Bergstrand) or The Rock Foundry SDX (recorded by Bob Rock), you can add genre-specific kits that are tailor-made for heavy music.

Cons for Metal Producers:
- Analysis Paralysis: The sheer number of options can be overwhelming. With a dozen mics on the snare alone, it’s easy to get lost tweaking and lose sight of the song.
- CPU Hungry: Running a full instance of SD3 with all mics active can put a serious strain on your system.
- Presets Can Be Too Polished: While the presets sound incredible, many are designed for rock, pop, or film scoring. They often require significant tweaking—more aggressive processing and sample choices—to fit a dense, modern metal mix right out of the box.
The Root of the Problem: Why Your Drums Sound Fake
The reason your programmed drums might sound robotic boils down to eliminating the very thing that makes music feel alive: human imperfection. SD3 gives you the tools to create perfection, but it’s your job as the producer to dial it back and inject some humanity.
The “Perfection” Trap: Grid Lock and Static Velocity
This is the number one offender. It’s when every drum hit lands perfectly on the 16th-note grid line with the exact same velocity. The result is the dreaded “machine-gun” effect, especially on fast kick patterns or snare rolls.
Think about a real drummer. Let’s say they’re playing a simple eighth-note rock beat.
- Velocity Isn’t Static: The snare on beat 2 might be at a velocity of 120, but the one on beat 4 might be 115. The hi-hats will have a natural pulsing dynamic. Ghost notes will be incredibly soft.
- Timing Isn’t Perfect: They might play slightly ahead of the beat (pushing) for an urgent feel or slightly behind it (pulling) for a heavier, laid-back groove.
- Timbre Changes: Where the stick hits the drum head or cymbal changes with every stroke, altering the tone. SD3 simulates this brilliantly with its multi-layered samples, but only if you use varying velocities to trigger them.
When you quantize everything to 100% and set all your snare hits to a velocity of 127, you bypass all of this beautiful, natural variation.
Ignoring the Performance Context
Another dead giveaway of programmed drums is ignoring how a real drummer’s performance changes based on the part they’re playing.
Take blast beats, for example. When a drummer launches into a 260 BPM gravity blast, they physically cannot hit the snare as hard as they do during a slow, pounding breakdown. Physics just won’t allow it. The hits are naturally lighter and faster.
So, if you program a breakdown with the snare at velocity 110 and then copy-paste that same velocity into your blast beat section, it’s going to sound completely unnatural and jarringly loud. A human drummer’s performance is dynamic across sections, and your programming needs to reflect that.
Programming Human Feel into Superior Drummer 3
Alright, let’s get into the actionable stuff. Here is how you can use SD3’s tools to program drums that breathe and groove.
Mastering Velocity: Your Most Important Tool
Velocity is more than just volume in Superior Drummer 3. It’s the key to unlocking different sample layers. A snare hit at velocity 40 isn’t just a quieter version of a hit at 127—it’s a completely different recording of a physically softer hit, with a different tone, attack, and resonance. Mastering velocity is non-negotiable.
Practical Velocity Techniques
- Alternate Your Hands: For any kind of fast pattern (16th-note hi-hats, snare rolls, double bass), never use the same velocity for consecutive notes. A good starting point is to simulate alternating hands or feet. Set one note to 120, the next to 114, the next to 122, the next to 116, and so on. This slight, semi-random variation instantly breaks up the machine-gun effect.
- Accent The Groove: The foundation of most grooves is the accent pattern. For a standard rock beat, the kick on 1 and 3 and the snare on 2 and 4 should be your strongest hits. Program them with higher velocities. Then, program the ghost notes and other subdivisions with significantly lower velocities (e.g., in the 20-60 range) to make them feel like they’re sitting “in between” the main hits.
- Use The Humanize Function (Wisely): In the Grid Editor, SD3 has a “Humanize” function. This will automatically apply randomization to the timing and velocity of selected notes. Don’t go overboard. A little goes a long way. Start by applying a very small amount of randomization—maybe a 5-10% variance on velocity and only a few ticks of timing offset. It’s a great tool for quickly adding subtle variation to hi-hat or ride cymbal patterns.
Escaping the Grid: Timing and Quantization
Nothing says “robot” like every single hit landing with mathematical precision. You need to let your drums breathe around the grid lines.
Actionable Timing Tips
- Use Quantize Strength: Nearly every DAW, as well as SD3’s Grid Editor, allows you to set the strength of your quantization. Instead of snapping notes 100% to the grid, try setting it to 85-95%. This was a technique mentioned by producer Dave Otero (Cattle Decapitation, Archspire); he often uses around 90% tightness. It pulls the notes closer to the grid, tightening up the performance without making it sound rigid. It preserves a bit of the original human feel.
- Manual Nudging is Your Friend: After a soft quantize, go in and listen critically. Does the chorus need to feel more urgent? Try selecting all the snare hits and nudging them forward by just a few milliseconds. Want the verse to feel heavier and more laid back? Nudge the kick and snare back a tiny bit. This micro-editing is what separates good programmers from great ones.
- Apply a Groove Quantize: Don’t just quantize to a straight grid. Most DAWs come with “groove” or “swing” templates. You can even extract a groove from a live drum loop you love. Applying a groove template to your MIDI will adjust the timing and velocity of your notes to match the feel of a real performance. It’s an incredibly powerful way to inject life into a static beat.
Blending and Reinforcement: The Pro Metal Approach
Often, the best-sounding modern metal drums aren’t 100% real or 100% programmed—they’re a hybrid. Samples are used to reinforce a great live performance, adding consistency and punch where it’s needed most. This is where SD3 truly shines.
Why You Can’t Just “Turn Up the Snare”
Let’s go back to our blast beat example. A drummer is playing fast, so their snare hits are weaker. In the mix, the snare gets lost. The obvious solution seems to be “turn up the snare mic.” Big mistake.
When you crank the volume on a close-mic’d snare track during a blast beat, you’re not just amplifying the snare. You’re also amplifying all the cymbal bleed crashing into that microphone. This results in a harsh, washy “pssshhhh” sound on every hit and introduces a “blast of weird frequencies” that makes the mix sound amateurish and cluttered.
Using Tracker 3 for Intelligent Reinforcement
This is the professional solution. Instead of turning up the messy snare track, you use a clean, powerful sample to support it.
- Import Your Audio: Open the Tracker tab in Superior Drummer 3. Drag your raw snare top audio file directly into it.
- Generate MIDI: Tracker will analyze the audio and intelligently detect every snare hit, converting the performance into a MIDI clip. Crucially, it doesn’t just detect the timing; it also analyzes the dynamics of the performance and translates that into MIDI velocity. The MIDI you get from Tracker isn’t a static, robotic pattern—it has the human drummer’s feel baked right in.
- Choose Your Sample: Head back to the Drums tab and load a snare you love. The MIDI from Tracker will now trigger this new sample.
- Blend to Taste: Here’s the key. You’re not trying to completely replace the original snare. You’re blending. Mix the powerful, clean SD3 sample in underneath your live snare track. This gives you the best of both worlds: the body and realism of the live snare, plus the consistent attack and punch of the sample, all without the nasty cymbal bleed. You can now pull the volume of the original snare mic down to a natural level and let the sample do the heavy lifting.

Advanced Sound Design in the SD3 Mixer
Once your performance feels human, you can use SD3’s internal mixer to make it sound colossal. This is where you can really separate your productions from the pack.
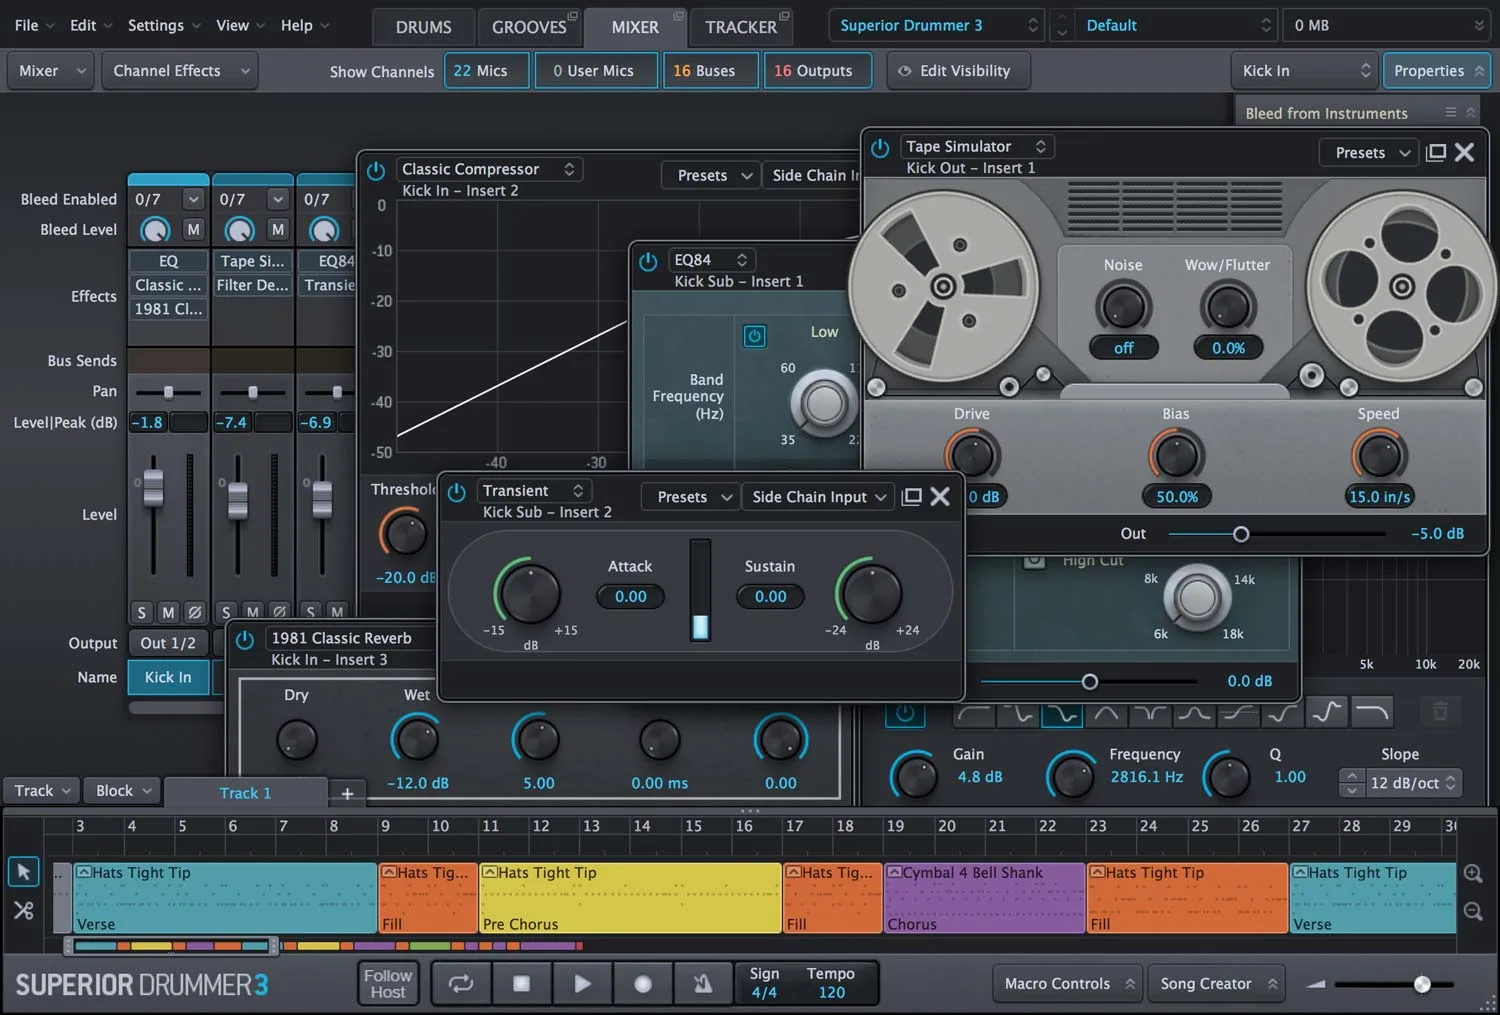
Leveraging Bleed for Realism
A hallmark of a fake-sounding drum kit is the complete lack of microphone bleed. In a real recording, the smack of the snare drum bleeds into the tom mics, the kick drum thumps through the overheads, and everything bleeds into the room mics. This “crosstalk” is what glues a drum kit together and makes it sound like a cohesive instrument in a real space.
In the SD3 mixer, every channel has a “Bleed Control” panel. Use it! Turn up the snare bleed in your overheads and room mics. Let a little bit of the kick drum thump into the bottom snare mic. Don’t be afraid to let the cymbals wash into the tom mics (within reason). This single step will add an incredible amount of depth and realism to your kit.
Parallel Processing and Bus Compression Inside SD3
The SD3 mixer is powerful enough that you can execute advanced mixing techniques right inside the plugin. A classic trick for massive metal drums is parallel compression.
- Create a new bus in the mixer (call it “DRUM SMASH”).
- Send your key shell pieces (kick, snare, toms) to this bus.
- On the “DRUM SMASH” bus channel, insert a compressor. The built-in FET compressor is perfect for this. Set it to a high ratio (8:1 or higher), a fast attack, and a medium-to-slow release.
- Crank the input gain so you’re getting 10-20dB of gain reduction. The goal is to absolutely smash the signal.
- Now, blend the fader of this “DRUM SMASH” bus back in underneath your main drum channels. Just a little bit of this hyper-compressed signal will add incredible punch, fatness, and energy to your overall drum sound. It’s one of the most powerful metal compression secrets you can use.
Bringing It All Together: The Nail The Mix Advantage
We’ve covered a lot of ground: velocity editing, timing adjustments, drum reinforcement, and advanced mixing techniques within Superior Drummer 3. Applying these concepts will fundamentally change how you approach drum production and help you leave the robotic sound behind for good.
Reading about these techniques is one thing. But watching a world-class producer put them into practice on a real song is a completely different level of learning.
This is exactly what Nail The Mix is all about. Every month, members get the raw multi-tracks from a massive metal song and get to watch the original producer mix it from scratch. You can see how pros like Jens Bogren, Will Putney, and Eyal Levi use tools like Superior Drummer 3 in their actual sessions. You get to see their exact velocity curves, their secret parallel processing chains, and how they blend samples to perfection. You’re not just learning theory; you’re seeing it applied in a real-world, high-stakes mix.
Spiritbox on Nail The Mix
Daniel Braunstein mixes “Holy Roller”
Get the Session
The producers on our list of instructors are the best in the business, and they hold nothing back. If you’re serious about making your Superior Drummer 3 tracks sound not just human, but professional and powerful, there is no better way to learn.
Check out the incredible catalog of sessions and see for yourself how the pros build those killer drum sounds from the ground up.